Chapter 8: Implementing Drag and Drop
This text was prepared for publication in March 2020. As a result, a lot of the code and techniques in this book are out of date. It is provided as a historical curio, and does not provide accurate guidance on using SwiftUI today.
iPadOS has some first-class support for drag-and-drop, and you can already take advantage of much of it without writing any code. If you open a to-do item editor, for example, you can select and drag text to or from any text field. You can select text in another app—for instance Safari—running in split screen, and drag that directly into the text view for item’s notes property. Many system controls and views already know how to deal with various types of data via drag & drop, in fact, including lists via the ForEach view. In this latter case, however, you’ll need to do a little extra work to tell SwiftUI what types of data you want to send or receive, and how to handle that data as it arrives.
This chapter’s starter project in the code bundle contains some new files providing some important implementation details. Find it in 8-DragAndDrop/starter.
Understanding Item Providers
Moving data around using drag & drop is accomplished using instances of NSItemProvider. This class encapsulates information about some piece of information and the various ways it can be encoded or decoded. Each encoded data format is represented by a Uniform Type Identifier or UTI, which is a string containing different identifiers in reverse-DNS format: the first element has the greatest scope, the last has the narrowest scope. These identifiers then have a hierarchy, where more narrowly-defined types conform to less narrowly-defined ones. Thus the public.text UTI contains all types and encodings of text, whether ASCII, UTF-8, UTF-32, or whether plain-text or formatted such as HTML or XML. If you only handle plain text, you’d use public.plain-text, or public.utf8-plain-text to only accept UTF-8 encoded data. If you want XML, then you’d use public.xml. See UTI Conformance for some examples of UTI conformance.
The NSItemProvider type was designed in Objective-C, and most of the API assumes it’s working in terms of model objects. These objects would then conform to and implement protocols to make themselves usable by the item provider system. When using Swift struct types, however, it takes a little more work to set things up. For this reason an item provider has been created for you in this chapter’s sample project—look in Model/ItemProvider.swift to find classes for sending and receiving data through an NSItemProvider. Most of the content of the file is out of the scope of a SwiftUI book, though your author would encourage you to look at it for some ideas on how you might implement something similar in your own application. Suffice to say that you’ll use a TodoItemProvider when dragging an item or list out of the app, and an ItemReceiver when receiving something dragged from elsewhere.
At the top of the file, however, are some important definitions:
// file: "Model/ItemProviders.swift"
let todoItemUTI = "com.pragprog.swiftui.todo.item"
let todoListUTI = "com.pragprog.swiftui.todo.list"
let todoItemUUIDUTI = "com.pragprog.swiftui.todo.item.uuid"
let todoListUUIDUTI = "com.pragprog.swiftui.todo.list.uuid"
let rawTextUTI = kUTTypeUTF8PlainText as String
let jsonUTI = kUTTypeJSON as String
Here you have the definitions of the UTIs supported by the application for vending and receiving to-do items and lists. On lines 1 and 2 are the identifiers for JSON-encoded items and lists. On lines 3 and 4 are identifiers for a type of data only usable within the application itself: these encode just the unique identifier (UUID) of the item being provided. Lastly, on lines 5 and 6 are some more Swift-friendly declarations of the public.utf8-plain-text and public.json identifiers, found in the CoreServices framework. When using the former, the item or list is encoded as a simple formatted string, suitable for dragging into a text editor, while the latter is used only when receiving plain JSON data that may or may not contain to-do item or list data.
Since two of these type identifiers are designed to export data in a structured format, their details have been added to the project’s Info.plist. If you open the project editor and select the application target, then the “Info” tab, you’ll see that there are two entries in the “Exported UTIs” section corresponding to the entries on lines 1 and 2 of ItemProviders.swift. Importantly, they are declared to conform to the UTI of JSON data, public.json; this means that they might be dragged to any application that works with generic JSON data, for instance a javascript editor. The figure below shows the conformance hierarchy for the types used by “Do It:”
Dragging Out
The ItemProvider class does just about everything you need, but first you have to obtain one. Since ItemProvider needs a reference to the DataCenter, it’s logical to provide API on DataCenter to provide them.
Open Model/DataCenter.swift and add an extension to define two new functions:
// file: "Model/DataCenter.swift"
// MARK: - Drag & Drop

extension DataCenter {
    func itemProvider(forList list: TodoItemList) -> NSItemProvider {
        let provider = TodoItemProvider(dataCenter: self, list: list)
        let result = NSItemProvider(object: provider)
        return result
    }

    func itemProvider(forItem item: TodoItem) -> NSItemProvider {
        let provider = TodoItemProvider(dataCenter: self, item: item)
        let result = NSItemProvider(object: provider)
        return result
    }
}
Now you’ll use this to implement item dragging from the list view.
There are two sets of methods used to implement drag and drop in SwiftUI on iOS. One set, provided when SwiftUI launched in iOS 13.0, is tailored exclusively to lists, while the other more generic variant arrived in iOS 13.4.
The first set consists of two view modifiers:
View.itemProvider(_:)allows you to attach a block which will vend an optionalNSItemProviderinstance relating to the view’s content.DynamicViewContent.onInsert(of:perform:)will call the provided block when a drop occurs of one of a set of allowed UTIs, along with the index at which the items was dropped. This is specifically for list types, and enables animations on the list view, moving rows out of the way as an item is dragged over.
The second, more general API involves some modifiers on the View type, and which apply to any view, not only lists:
onDrag(_:)operates in a manner similar to the olderitemProvider(_:), except that the provided block is not optional, and returns a non-optionalNSItemProvider.onDrop(of:isTargeted:perform:)andonDrop(of:delegate:)provide drop support for any view, although at this time this does not appear to includeList,Form, orForEachviews.
The drop API is quite flexible, and in fact contains three APIs, two of which have the same selector but accept different blocks. You’ll learn more about these later in this chapter.
Dropping on Lists
One drawback in SwiftUI is that in any
ListorFormview on iOS, this is the only way to receive items via drag-and-drop, and it always acts as though a new item will be inserted into the list. None of the variousonDrop()modifiers appear to work on aListor its contents at all, and any attempt to useonInsert()to add an item will cause existing list contents to move out of the way, making it impossible to, say, drag an item onto a list row to add that item to that list. Hopefully this will be resolved in a future version of SwiftUI.
Open TodoItemRow.swift and update its body property to add an onDrag(_:) modifier to the outermost HStack, returning an item provider for that row’s item:
// file: "TodoItemRow.swift"
var body: some View {
    HStack {
        // « ... »
    }
    .onDrag { self.data.itemProvider(forItem: self.item) }
}
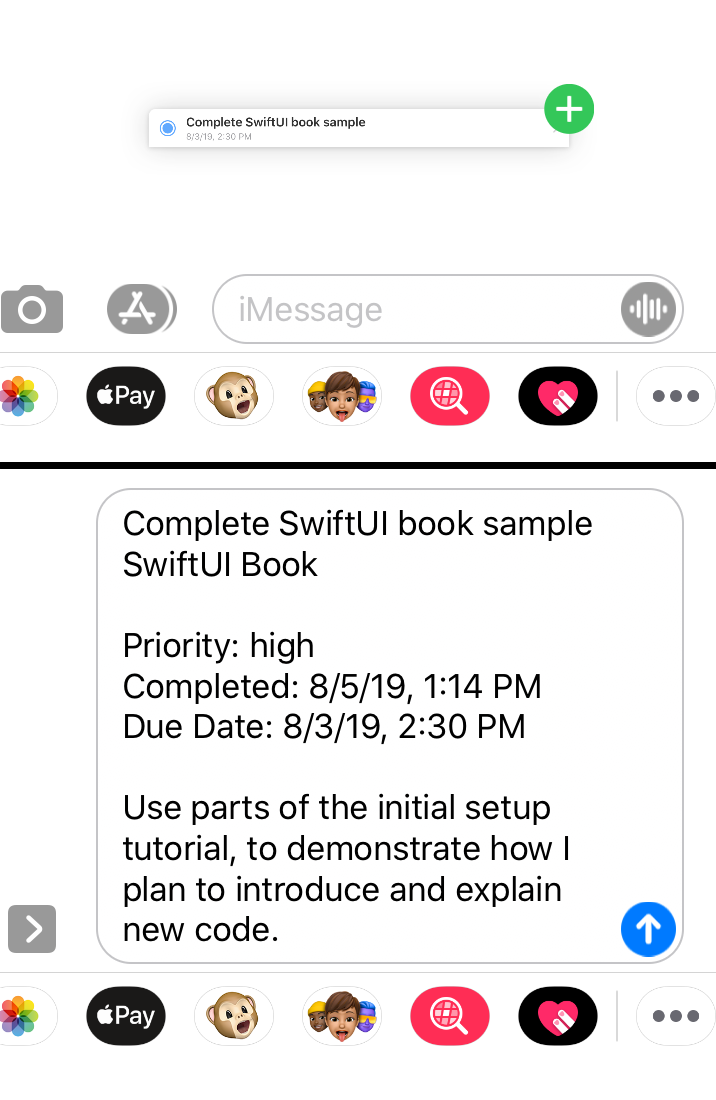
Launch your application on an iPad, or the iPad simulator, then open another app next to it in which you can type—Messages is available on the simulator and works nicely. Navigate into an item list and then drag the item out and onto the Messages compose window. When you drop it, the text version of your data will appear in the new message field, as shown below:
Implementing the same functionality for lists is nearly identical; this time, open Home.swift and add the onDrag(_:) modifier within the body property of the Home view itself, attached to the Row instance:
// file: "Home.swift"
ForEach(data.todoLists) { list in
    NavigationLink(destination: TodoList(list: list).font(nil),
                   tag: .list(list.id),
                   selection: self.$selection) {
        Row(name: list.name,icon: list.icon, color: list.color.uiColor)
            .onDrag { self.data.itemProvider(forList: list) }
    }
}
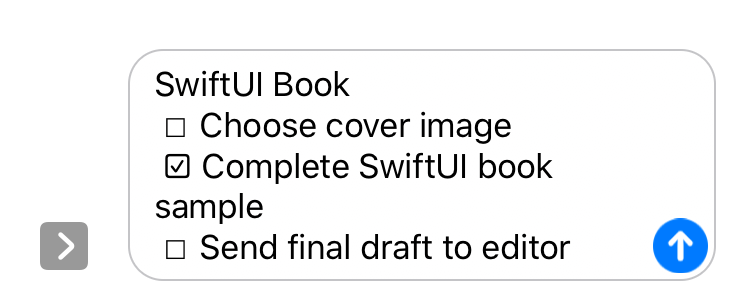
Repeat the experiment with the Messages app, this time dragging a list out of the Home view, and you’ll be rewarded with something like this:
Dragging In
So far you’ve seen how to export items and lists via drag & drop, but that’s only using the string exported. The other supported UTIs are all specific to this application, or to an application using the same data types, and they’re designed to let you drag items around within the same application. For example, you might drag items into different lists rather than opening each item’s editor individually and navigating the interface there to select a list.
When dragging into a list, you use the onInsert(of:perform:) modifier to decide what you’d like to receive and to handle any dropped items. This is the older API which is intended for inserting a new item into a list, and this is the only option available to lists (see Dropping on Lists).
Return to TodoList.swift. Scroll down toward the bottom of the “Helper Properties” extension and locate the droppableUTIs property:
// file: "TodoList.swift"
private var droppableUTIs: [String] {
    return []
}
Let’s modify this to return values appropriate for the type of data being displayed. If a list is being shown, then todo items can be dropped onto it, along with plain strings (which you’ll use to create a new item). If one of the group types is being displayed, then the suitable interactions are much fewer:
- “Today:” For an item to appear here, it needs to have a due date today. While you might drag an item onto this list to assign it a due date of midnight tonight (for instance), this doesn’t really feel ideal. If such an operation were useful, dropping it on the button in the
HomeHeaderwould seem more appropriate, if anything. - “Scheduled:” This shows anything with a due date, across the entirety of time. It doesn’t seem useful as a drop target—what date would it assign, and what would the index of its drop location mean?
- “Overdue:” Dropping here would… what? Mark an item overdue? What date would it assign? Again, what would the drop location imply?
- “All Items:” This alone seems appropriate as a drop target. Any item already in the data store wouldn’t be usefully dropped (it’s already there), but new items in JSON and new items from strings would be fine. You need only ensure that the item landed in the right index within the global item list, to ensure it doesn’t “jump” to the end after being dropped.
With this in mind, update the definition of droppableUTIs to return different non-empty UTI arrays based on the type of data being displayed:
// file: "TodoList.swift"
private var droppableUTIs: [String] {
    switch listData {
    case .list: return [rawTextUTI, todoItemUUIDUTI, todoItemUTI, jsonUTI]
    case .group(.all): return [rawTextUTI, todoItemUTI, jsonUTI]
    default: return []
    }
}
Now scroll further down and locate a method within the “Model Manipulation” extension named handleDrop(at:providers:). This is where you’ll handle any data dropped onto the list. At present it only contains some verification of the data being displayed, and the beginnings of an invocation of ItemReceiver.readFromProviders(_:completion:). Some basic error handling is there, but the rest needs needs to be implemented.
While the ItemReceiver class handles the specifics of dealing with NSItemProvider, it’s still necessary to look at the returned values. Remember that multiple items can be included in a single drag operation, so the system provides one NSItemProvider instance for each item being dropped. ItemReceiver manages all of these asynchronously and hands out an array of ItemReceiver.Output instances containing the decoded data. This is an enum type, defined in Model/ItemProviders.swift:
// file: "Model/ItemProviders.swift"
enum Output {
    case item(TodoItem)
    case list(TodoItemList, [TodoItem])
    case existingItem(TodoItem)
    case existingList(TodoItemList)
    case string(String)
}
There is one enum entry here for each of the UTI’s defined at the top of the file.
To handle these values, return to TodoList.swift and the handleDrop() method, and add a for loop to iterate over the dropped items. Start by handling just the existing-item case:
// file: "TodoList.swift"
for value in output {
    switch value {
    case .existingItem(let item):
        if item.listID == list.id {
            // just move it up or down
            let items = self.data.items(in: list)
            if let curIndex = items.firstIndex(where: {$0.id == item.id}) {
                let indices = IndexSet(integer: curIndex)
                self.data.moveTodoItems(fromOffsets: indices,
                                        to: index, within: list)
                break
            }
        }
        else {
            self.data.moveTodoItems(withIDs: [item.id],
                                    toList: list,
                                    at: index)
        }

    default:
        self.errorPublisher
            .send(ItemProviderError.unsupportedDataType)
        return
    }
}
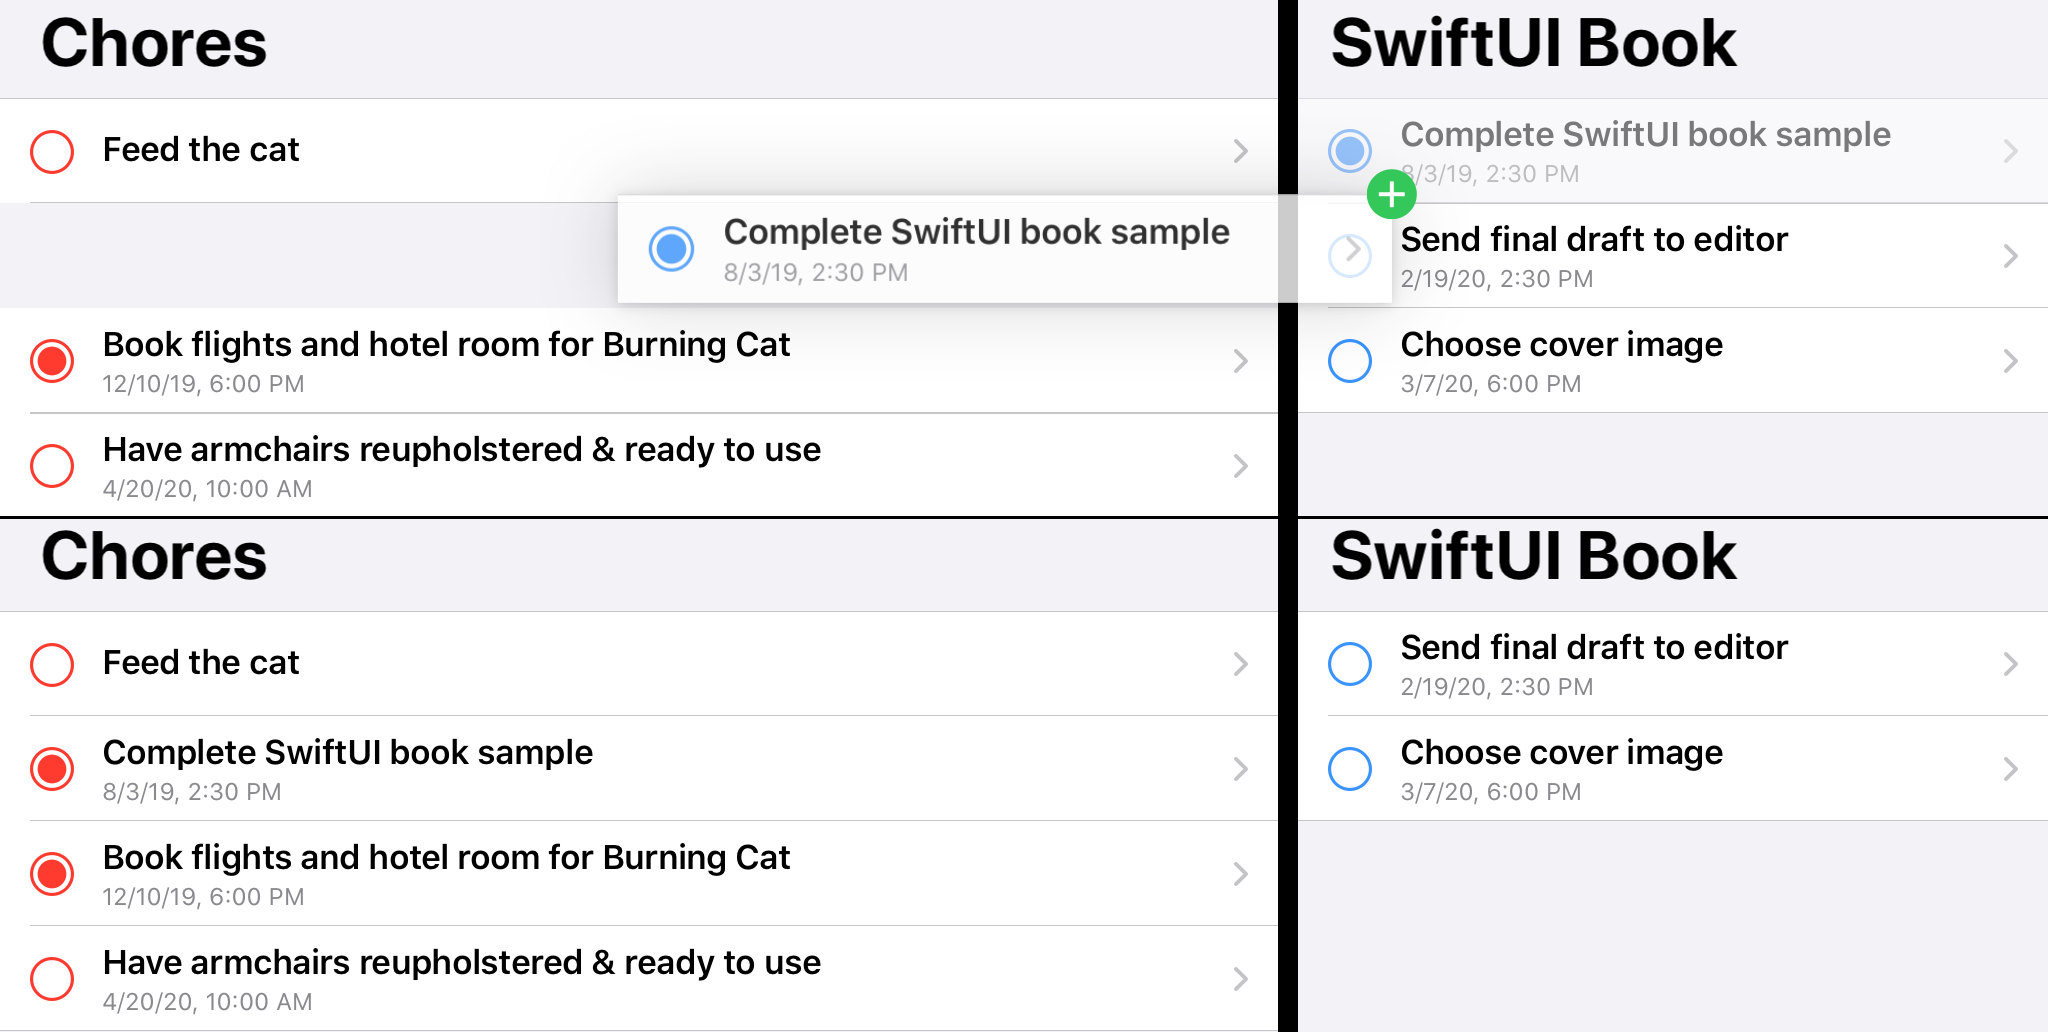
The majority of the work is being done by the DataCenter here, but there is still a check to make: if the item is being dropped on the same list of which it’s currently a member, you should treat it as a simple move operation, in the same manner as the onMove() modifier in this view’s body. If not, then the DataCenter handles the business of moving the item from one list to another, updating the affected lists and items appropriately.
You can try this out now: launch the application on an iPad or the iPad Simulator, then open a second instance alongside it. Navigate to a different list in each scene, and drag an item out of one list and into the other. You’ll see the dropped item land in the requested position, and if you navigate in each scene to the opposite scene’s list you’ll see that the changes are reflected on both sides.
The next type of drop you’ll need to handle is a brand new item. This is handled slightly differently depending on whether the view is displaying a single list or the “All Items” group: in the former case the item is simply added and then shuffled into place within the list; in the latter the drop index means something different, so it just adds the item to the end of the list and let the data center handle the index internally.
Add the following new case, after the .existingItem case:
// file: "TodoList.swift"
case .item(let item):
    // insert at end of list
    let items = self.data.items(in: list)
    var newItem = item
    newItem.listID = list.id
    if case .group(.all) = self.listData {
        self.data.addTodoItem(newItem, globalIndex: index)
    }
    else {
        self.data.undoManager?.beginUndoGrouping()
        self.data.addTodoItem(newItem)
        let offsets = IndexSet(integer: items.count)
        self.data.moveTodoItems(fromOffsets: offsets,
                                to: index, within: list)
        self.data.undoManager?.endUndoGrouping()
    }
Note the calls to beginUndoGrouping() and endUndoGrouping() on the DataCenter’s undoManager property: most undo/redo registration happens automatically, but in this case you want the addTodoItem() and the moveTodoItems() to be a single undo/redo operation. You’ll hook into the NSUndoManager later in this chapter.
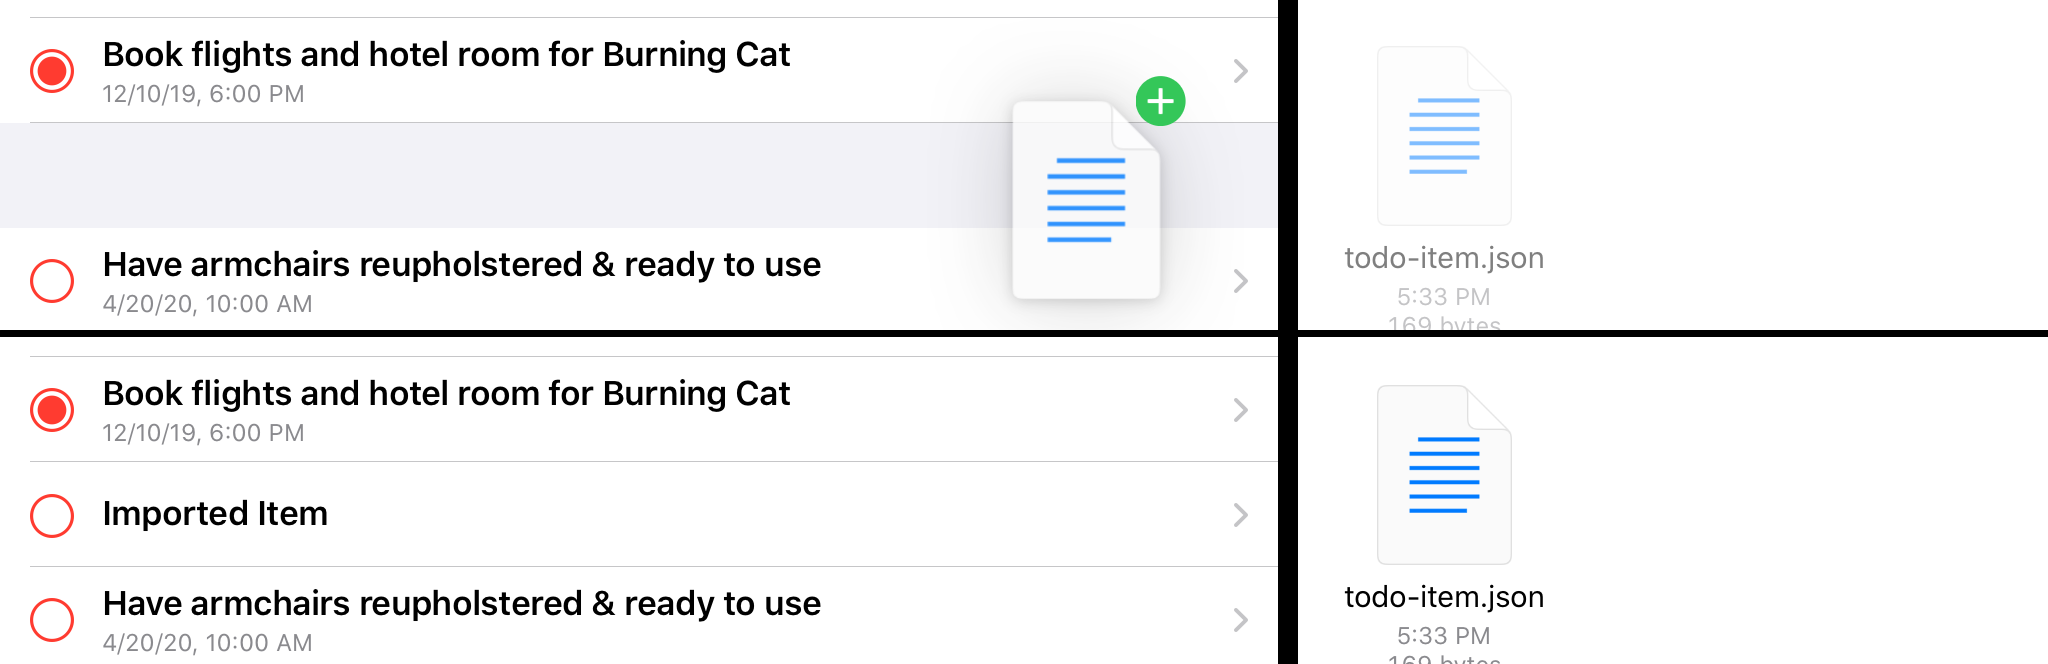
Testing this is a little harder. There is a JSON file in the code download for this book, at sample-data/todo-item-drop.json. You can load this file into the Files app on your iPad or iPad Simulator and then drag it from there into a list to see it take effect:
The last type to handle is a plain string. A user can create a new to-do item by dragging some text into a list, and the new item will be created using that text as its title. This functions very similarly to the .item case, simply creating a new TodoItem rather than receiving one already made:
// file: "TodoList.swift"
case .string(let str):
    // new item with this as its title
    let items = self.data.items(in: list)
    let newItem = TodoItem(title: str, priority: .normal,
                           listID: list.id)
    if case .group(.all) = self.listData {
        self.data.addTodoItem(newItem, globalIndex: index)
    }
    else {
        self.data.undoManager?.beginUndoGrouping()
        self.data.addTodoItem(newItem)
        let offsets = IndexSet(integer: items.count)
        self.data.moveTodoItems(fromOffsets: offsets,
                                to: index, within: list)
        self.data.undoManager?.endUndoGrouping()
    }
Try this out by launching Safari alongside the application, selecting some text, and dragging it across.
Dropping Lists
Adding drop support to the Home view is very similar. A largely empty implementation of handleDrop(at:providers:) is already present in Home.swift in the starter project, so you need only add case statements for list and string inputs:
// file: "Home.swift"
case let .list(list, items):
    self.data.undoManager?.beginUndoGrouping()
    self.data.addList(list)
    for item in items {
        self.data.addTodoItem(item)
    }
    self.data.undoManager?.endUndoGrouping()

case let .string(str):
    let list = TodoItemList(name: str, color: .random(),
                            icon: randomIcon())
    self.data.addList(list)
Attaching this to the view is likewise a straightforward task; add the following after the onDelete() and onMove() modifiers in the view’s body:
// file: "Home.swift"
ForEach(data.todoLists) { list in
    // « ... »
}
// « onDelete »
// « onMove »
.onInsert(of: [todoListUTI, jsonUTI, rawTextUTI],
          perform: self.handleDrop(at:providers:))
Dragging New Scenes
One convenient feature in iPadOS 13 is the ability to create a new scene within your application through drag & drop. For instance, dragging a tab or a URL within Safari onto the edge of the screen will open a second scene containing the item being dragged. If you’re looking to move items around by dragging them from one list to another, it would be a lot simpler if there were a single gesture that would open a second list in a new scene; well, that is possible with SwiftUI as well, though much of the work takes place in UIKit and the Scene Delegate. There are some steps to take to have it all nicely integrated, though, as you’ll see.
The primary means by which the system knows to make ‘open a scene’ available as a drag target comes from data attached to the dragged item’s NSItemProvider. In this case, contained data or its UTI aren’t used—instead, an NSUserActivity instance is used to determine the intent. Any application can define activity identifiers (strings in the familiar reverse-DNS format) that it will handle. If a dragged item with such an activity attached reaches the edge of the screen, iPadOS will instruct the application that responds to this activity type to create a new scene, and the activity itself will be passed into the delegate of that new scene.
The first thing, then, is to declare that your application supports activities, which is done through an entry in the app’s Info.plist file. Select the project in Xcode’s Project Navigator, then the “Do It” target, and finally the Info tab. Add a new row to the property list named NSUserActivityTypes and make it an Array. Next add two items within that array, and give them values of com.pragprog.swiftui.ShowTodoItem and com.pragprog.swiftui.ShowTodoList. The result should look something like this:

Next, open Model/ItemProviders.swift and look for the NSUserActivity section, near line 100. In here are extensions for the TodoItem and TodoItemList types, each defining their associated activity type along with a property to obtain an NSUserActivity instance corresponding to a particular item or list. The details are fairly sparse, since all you need for the purpose of opening a new scene is some way to identify which item or list you should show. The only metadata you need alongside the activity’s type identifier is the UUID of the item in question:
// file: "Model/ItemProviders.swift"
var userActivity: NSUserActivity {
    let activity = NSUserActivity(activityType: Self.activityType)
    activity.title = name
    activity.targetContentIdentifier = id.uuidString
    return activity
}
To attach these activities to your item providers, open Model/DataCenter.swift and find the “Drag & Drop” extension containing the two itemProvider() methods. You attach a user activity to an item provider using NSItemProvider.registerObject(_:visibility:), which adds a new type of data to those supplied by the item provider. In this case it adds data with a UTI of com.apple.uikit.useractivity. To attach the activity, add something like the following to both itemProvider() methods:
// file: "Model/DataCenter.swift"
let result = NSItemProvider(object: provider)
result.registerObject(list.userActivity, visibility: .all)
return result
The job of handling this activity information falls to your SceneDelegate. When a scene session is connected, your delegate will be provided with a set of UIScene.ConnectionOptions, and from there you can determine whether you’ve been invoked in response to a user activity.
Open SceneDelegate.swift and look at the top function: scene(_:willConnectTo:options:). The starter project has factored out the creation and assignment of the UIHostingController into a new method, presentView(_:in:), and you’ll use this to put your chosen SwiftUI view on the screen.
Start by looking at any user activities in the provided connection options; you’ll use only the first handled instance. Add this code just above the call to presentView(Home(), in: scene):
// file: "SceneDelegate.swift"
for activity in connectionOptions.userActivities {
    guard let contentID = activity.targetContentIdentifier else {
        continue
    }

    switch activity.activityType {
    default:
        break
    }
}
You skip anything without a targetContentIdentifier, since you need that to locate any referenced list or item. Next you look at the activity type, and skip any that you don’t recognize; at the moment, that’s everything. Add a case for handling TodoItemList.activityType:
// file: "SceneDelegate.swift"
case TodoItemList.activityType:
    guard
        let uuid = UUID(uuidString: contentID),
        let list = sharedDataCenter.list(withID: uuid)
        else { break }
    let view = TodoList(list: list)
    presentView(view, in: scene)
    return
Here you decode the UUID from the activity’s targetContentIdentifier, then locate the corresponding TodoItemList. If that all works, then you simply present that list in a new TodoList view. Fairly straightforward.
Let’s test it out. Launch the app on an iPad or iPad simulator, then drag a list out towards the edge of the screen, and when the system reveals a new scene area as a drop target, let go. A new scene will appear showing your list—it worked
Well, almost:

The entire UI is disabled, and there’s no title—actually, there’s no navigation bar at all. In fact, that’s why the list is disabled: the NavigationLink views only function within a NavigationView, and you’re only displaying a TodoList, which doesn’t contain a navigation view. You’ll need to add one. This could be as simple as wrapping one in the code you used above:
let view = NavigationView { TodoList(list: list) }
presentView(view, in: scene)
Try that in portrait orientation and you’ll likely see something odd, though: the iPad shows the (currently empty) detail view and slides the top-level view off the scene’s leading edge. Instead, you want to always use a stack format similar to the iPhone, so add a call to .navigationViewStyle() to fix that:
let view = NavigationView {
    TodoList(list: list)
}
.navigationViewStyle(StackNavigationViewStyle())
presentView(view, in: scene)
However, while you’re here, let’s add something else. Apple suggests that secondary scenes provide some way for the user to easily dismiss them; let’s add that capability by adding a “Done” button to the leading edge of the new scene’s navigation bar. The means to dismiss a scene is through the shared UIApplication instance’s requestSceneSessionDestruction() method, which requires a reference to the UISceneSession being dismissed and optionally a handler for any errors that occur.
That gives you something like this:
let button = Button(action: {
    UIApplication.shared
        .requestSceneSessionDestruction(session, options: nil,
                                        errorHandler: nil)
}) {
    Text("Done")
        .bold()
}
let view = NavigationView {
    TodoList(list: list)
        .navigationBarItems(leading: button)
}
.navigationViewStyle(StackNavigationViewStyle())
Now think about what your code will look like for the other activity you need to handle: everything except TodoList(list: list) is going to be identical. So, that’s 12 lines of boilerplate in 13 lines of code. This is ripe for factoring, so that’s what you’ll do, by creating a ViewModifier to handle the details.
Open AccessoryViews/ViewModifiers.swift, and scroll down to the View extension. Just above this, create a new ViewModifier type named SceneSessionDismissal, with properties for the UISceneSession and optional error-handler:
// file: "AccessoryViews/ViewModifiers.swift"
struct SceneSessionDismissal: ViewModifier {
    private let session: UISceneSession
    private let errorHandler: ((Error) -> Void)?

    init(_ session: UISceneSession, errorHandler: ((Error) -> Void)? = nil) {
        self.session = session
        self.errorHandler = errorHandler
    }

    func body(content: Content) -> some View {
        // « ... »
    }
}
The content of the body(content:) method should be familiar:
// file: "AccessoryViews/ViewModifiers.swift"
func body(content: Content) -> some View {
    let button = Button(action: {
        UIApplication.shared
            .requestSceneSessionDestruction(self.session, options: nil,
                                            errorHandler: self.errorHandler)
    }) {
        Text("Done")
            .bold()
    }

    return NavigationView {
        content.navigationBarItems(leading: button)
    }
    .navigationViewStyle(StackNavigationViewStyle())
}
For conciseness, add a new function to the bottom of the View extension here to wrap the modifier into a single call:
// file: "AccessoryViews/ViewModifiers.swift"
extension View {
    // « ... »

    func dismissingSceneSession(
        _ session: UISceneSession,
        errorHandler: ((Error) -> Void)? = nil
    ) -> some View {
        modifier(SceneSessionDismissal(session, errorHandler: errorHandler))
    }
}
With this, your activity handler in SceneDelegate.swift can be updated with just one extra line:
// file: "SceneDelegate.swift"
let view = TodoList(list: list)
    .dismissingSceneSession(session)
presentView(view, in: scene)
The case for handling a single item is very similar:
// file: "SceneDelegate.swift"
case TodoItem.activityType:
    guard
        let uuid = UUID(uuidString: contentID),
        let item = sharedDataCenter.item(withID: uuid)
        else { break }
    let view = TodoItemDetail(item: item)
        .dismissingSceneSession(session)
    presentView(view, in: scene)
    return
Rebuild your application and drag out new scenes from lists and items. They should all appear and function correctly, and the “Done” button in their navigation bars should close the scene correctly.
What You Learned
This chapter has covered a lot of ground, and you’ve now used all of the basic drag and drop APIs provided by SwiftUI.
- Implementation of drop support for insertion into list views, each defining the specific types of data it will accept.
- Exporting and importing data in several different formats.
- Dragging and dropping items within the same application across scenes and views to make gestural modifications to your data model.
- Using drag and drop gestures to spawn new scenes displaying a subset of your app’s data.
In the last chapter, we’re going to look at how you might integrate your SwiftUI application with a Core Data model, such as you might encounter in a more complicated application. You’ll learn the tools available from SwiftUI, build some of your own, and learn what you’ll need to do differently when dealing with referential model types rather than value types.